Getting an Indy Desktop
My last post about the Indy was a bit of a downer - I may have learned a lot, but I didn’t get much closer to a usable IRIX desktop. In contrast, this post does end happily. I hope that the screenshots at the end make up for how incredibly long it is.
Replacing the hard disk with a microSD card
The working disk in my Indy has an OS installed, but I’ve had trouble logging in. Rather than erase and re-install IRIX onto that disk (and lose whatever applications it might have!), I wanted to save it and use a new disk. While used SCSI hard disks are available (and from my reading, some new Ultra320 SCSI drives are capable of running in SCSI 2 mode), I’ve decided to avoid spinning-rust disks in favor of the SCSI2SD.
The SCSI2SD uses a microcontroller to emulate a SCSI device in software and stores data on a microSD card. It’s not quite plug-and-play - to get it ready for use, I had to:
- Insert a microSD card: I’m using a pretty cheap 8GB SanDisk - I figure 8GB was a pretty large disk at the time, given the two that came with my Indy were 1GB and 500 MB
- Download software: both the SCSI2SD firmware and
scsi2sd-util- there are different versions for the SCSI2SD v5 and SCSI2SD v6 hardware revisions - Flash the firmware: This step threw me a bit - I had to open
scsi2sd-util, go to the “Upgrade Firmware” window, and then plug the SCSI2SD in with USB. I spent a little time wondering why when I plugged mine in,scsi2sd-utildidn’t recognize it - the reason is you have to flash it before it works. - Upload settings: I grabbed settings from the Nekochan wiki. The most important ones for the Indy are parity and SCSI2 Mode.
- Remove the terminators: The SCSI2SD has built-in terminators, but so does the Indy’s SCSI cable. The SCSI2SD terminators are in removable SIP packages, so I just pulled them out.
With the SCSI2SD drive ready to go, it needed to be installed in the Indy. The SCSI2SD docs recommend not letting it rest directly on “conductive material” (like the metal floor of the case), so I had find a way to attach it to the drive mounting bracket. I didn’t have any spacers to safely screw it on directly, so instead I got creative with Command Strips (something quite plentiful in my household):
I’ll take “Unconventional Uses of Command Strips” for $300, Alex pic.twitter.com/ra2cMLB6Fd
— cron mom (@sophaskins) August 28, 2017
Netbooting: a new tool
In “Booting the Indy”, I used the DINA VM image for a netboot server. Since then, I’ve had some trouble getting DINA running again, so I decided to give another tool a try: irixboot. The project’s README has most of the instructions I needed. My install discs were:
irix/6.5/inst/IRIX 6.5 Installation Tools.imgdownloadirix/6.5/foundation/IRIX 6.5 Foundation 1.imgdownloadirix/6.5/foundation/IRIX 6.5 Foundation 2.imgdownloadirix/6.5/applications/IRIX 6.5 Applications.imgdownloadirix/6.5/nfs/ONC3 NFS Version3.imgdownload
from the images hosted on the Internet Archive. Since I was running from Linux instead of Windows (what the irixboot author tested), the bridgenic param was just the name of my server’s ethernet interface (eno1). From there, all I needed was a vagrant up and I was ready!
Partitioning the disk
In most modern OS installers, partitioning the disk is part of the install process. Not so on IRIX! The IRIX installer seems to use the disk to store temporary files during installation, so you have to have valid partitions set up separately. To do that, you must boot to the Command Monitor:
System Maintenance Menu

1) Start System
2) Install System Software
3) Run Diagnostics
4) Recover System
5) Enter Command Monitor

Option? 5
Command Monitor.  Type "exit" to return to the menu.
>>
and boot in to the fx partitioner from the “Installation Tools” disk
>> bootp():/inst/stand/fx.ARCS
Setting $netaddr to 192.168.1.242 (from server )
Obtaining /inst/stand/fx.ARCS from server
93664+25632+7056+2804464+48784d+5808+8832 entry: 0x8bd4b0f0
Currently in safe read-only mode.
In the command I entered.
bootp():says “use whatever server BOOTP tells you to”/instthe path to the Installation Tools disc inirixbootstand/fx.ARCSis the path to thefxpartitioning tool on that disc.
I found Future Technology’s guide valuable in figuring out how to set things up - I accepted the defaults at each prompt until I got to the menu:
----- please choose one (? for help, .. to quit this menu)-----
[exi]t               [d]ebug/             [l]abel/
[b]adblock/          [exe]rcise/          [r]epartition/
fx>
chose “repartition” on the “rootdrive”, with the XFS filesystem:
fx> r

----- partitions-----
part  type        blocks            Megabytes   (base+size)
  0: xfs      266240 + 15201280     130 + 7422
  1: raw        4096 + 262144         2 + 128
  8: volhdr        0 + 4096           0 + 2
 10: volume        0 + 15467520       0 + 7552

capacity is 15467520 blocks

----- please choose one (? for help, .. to quit this menu)-----
[ro]otdrive        [u]srrootdrive     [o]ptiondrive      [re]size
fx/repartition> ro

fx/repartition/rootdrive: type of data partition = (xfs)
Warning: you will need to re-install all software and restore user data
from backups after changing the partition layout.  Changing partitions
will cause all data on the drive to be lost.  Be sure you have the drive
backed up if it contains any user data.  Continue? yes
The Future Technology guide says you need to add a “label”, but that didn’t seem to be an option for me, so I just proceeded to /exit.
Netbooting the IRIX installer
That took me back to the “System Maintenance Menu” - this time choosing to “Install System Software”:
                         Installing System Software...

                       Press <Esc> to return to the menu.


1) Remote Tape  2) Remote Directory  X) Local CD-ROM  X) Local Tape

Enter 1-4 to select source type, <esc> to quit,
or <enter> to start:
I used 2 for “Remote Directory”, entered in the IP address of my irixboot server and the path to the install tools disc:
Enter the name of the remote host: 192.168.1.10
Enter the remote directory: /inst/dist
This kicks you back to the “Installing System Software” menu - you press enter to use your chosen settings to kick off an install:
Setting $netaddr to 192.168.1.242 (from server )
Copying installation program to disk.
Setting $netaddr to 192.168.1.242 (from server )
......... 10% ......... 20% ......... 30% ......... 40% ......... 50%
......... 60% ......... 70% ......... 80% ......... 90% ......... 100%

Copy complete
Setting $netaddr to 192.168.1.242 (from server )
Setting $netaddr to 192.168.1.242 (from server )
IRIX Release 6.5 IP22 Version 05190108 System V
Copyright 1987-1998 Silicon Graphics, Inc.
All Rights Reserved.

gfe1: missing
gfe0: missing
xpi0: missing from slot 1
xpi0: missing from slot 0
root on /hw/node/io/gio/hpc/scsi_ctlr/0/target/1/lun/0/disk/partition/1/block ; boot swap file on /dev/swap swplo 57000
Creating miniroot devices, please wait...
/hw/node/io/gio/hpc/scsi_ctlr/0/target/1/lun/0/disk/volume/char: [Alert] Illegal request: Illegal field in CDB (asc=0x24, asq=0x0), Block #0

Current system date is Mon Dec 15 12:14:34 PST 2014
(the clock in my machine is stuck in the past!).
Since I just repartitioned the disk in fx, the installer needs to make a file system on it:
Mounting file systems:

/dev/dsk/dks0d1s0: Invalid argument
/hw/node/io/gio/hpc/scsi_ctlr/0/target/1/lun/0/disk/volume/char: [Alert] Illegal request: Illegal field in CDB (asc=0x24, asq=0x0), Block #40601
No valid file system found on: /dev/dsk/dks0d1s0
This is your system disk: without it we have nothing
on which to install software.
Make new file system on /dev/dsk/dks0d1s0 [yes/no/sh/help]: yes

About to remake (mkfs) file system on: /dev/dsk/dks0d1s0
This will destroy all data on disk partition: /dev/dsk/dks0d1s0.

        Are you sure? [y/n] (n): y

        Block size of filesystem 512 or 4096 bytes? 4096

Doing: mkfs -b size=4096 /dev/dsk/dks0d1s0
meta-data=/dev/rdsk/dks0d1s0     isize=256    agcount=8, agsize=237520 blks
data     =                       bsize=4096   blocks=1900160, imaxpct=25
         =                       sunit=0      swidth=0 blks
log      =internal log           bsize=4096   blocks=1000
realtime =none                   extsz=65536  blocks=0, rtextents=0
unwritten flagging is enabled

Trying again to mount /dev/dsk/dks0d1s0 on /root.

/hw/node/io/gio/hpc/scsi_ctlr/0/target/1/lun/0/disk/volume/char: [Alert] Illegal request: Illegal field in CDB (asc=0x24, asq=0x0), Block #0
UX:make: INFO: `scsi' is up to date.
    /dev/miniroot            on  /
    /dev/dsk/dks0d1s0        on  /root
Installing IRIX
Now it’s time for the real installing to begin.
Invoking software installation.

What is the hostname (system name) of your machine? indy
What is the network address of indy? 192.168.1.242
What is the netmask for 192.168.1.242?
Press Enter for the IP class default [0xffffff00]:
Starting network with hostname: indy, at ip address: 192.168.1.242
Man, it’s asking again for an IP address - the Indy is from an time where ubiquitous reliable DHCP was not a thing. That final obstacle was all gated the main menu of the IRIX install tool (creatively named inst):
Default distribution to install from: 192.168.1.10:/inst/dist

For help on inst commands, type "help overview".


Inst 3.3 Main Menu

 1. from [source ...]            Specify location of software to be installed
 2. open [source ...]            Specify additional software locations
 3. close [source ...]           Close a software distribution location
 4. list [keywords] [names]      Display information about software subsystems
 5. go                           Perform software installation and removal now
 6. install [keywords] [names]   Select subsystems to be installed
 7. remove [keywords] [names]    Select subsystems to be removed
 8. keep [keywords] [names]      Do not install or remove these subsystems
 9. step [keywords] [names]      Interactive mode for install/remove/keep
10. conflicts [choice ...]       List or resolve installation conflicts
11. help [topic]                 Get help in general or on a specific word
12. view ...                     Go to the View Commands Menu
13. admin ...                    Go to the Administrative Commands Menu
14. quit                         Terminate software installation

Inst>
The “default distribution” is a reminder that inst knows about the “Installation Tools” disc it booted from, but needs to be told about the other four CDs:
Inst> open irixboot:foundation/dist
What is the network address of irixboot? 192.168.1.10
Reading product descriptions .. 100% Done.

Inst> open irixboot:apps/dist

...
there was a long readme about Netscape here
...

Inst> open irixboot:nfs/dist
Relocating distribution location irixboot:nfs/dist to irixboot:nfs/dist/dist6.5
.
Reading product descriptions .. 100% Done.

Inst>
I went with the package sets Future Technology recommended, and started the installation:
Inst> keep *

Inst> install standard

Inst> install prereqs
No matches for "prereqs" were found

Inst> go
This takes a very long time (the Future Technology Guide even has a table of how different workstations perform differently - apparently CPU has a lot to do with it). Mine took 130 minutes, from go to reboot:
Ready to restart the system.  Restart? { (y)es, (n)o, (sh)ell, (h)elp }:
Preparing to restart system ...

The system is being restarted.
Postinstall
After install, the machine came up nicely:
IRIX Release 6.5 IP22 Version 05190003 System V
Copyright 1987-1998 Silicon Graphics, Inc.
All Rights Reserved.

dksc0d1: [Alert] Illegal request: Illegal field in CDB (asc=0x24, asq=0x0), Block #0
The system is coming up.
Warning: Internet Gateway web server running as root.
Use "chkconfig webface off" if you wish to disable.
startup: listening to port 80 as nobody


indy console login: root
IRIX Release 6.5 IP22 indy
Copyright 1987-1998 Silicon Graphics, Inc. All Rights Reserved.
Last login: Mon Dec 15 14:46:00 PST 2014 on ttyd1
TERM = (vt100)
indy 1#
Since I was still using a serial console, my first steps from here were to set up remote X sessions. Mine needed:
-
DNS to be configured in
/etc/resolv.conf:domain taketimetobesafe.biz nameserver 192.168.1.1 -
a default route to be entered in
/etc/config/static-route.options:$ROUTE $QUIET add net default 192.168.1.1 -
an X11 font server enabled (where would we be without fonts!):
indy # chkconfig fontserver on
Since I had just changed a bunch of network connections (and this machine was made in 1993) a reboot seemed in order. After it came back up, I connected a remote X session. In this case, I was using Xming on Windows (for some reason XQuartz just crashes when I try to connect). The effective Xnest command my options translates to is: Xnest -query indy.taketimetobesafe.biz -screen 0 1024x768@1 -fp tcp/indy.taketimetobesafe.biz:7100. This gave me a login window!
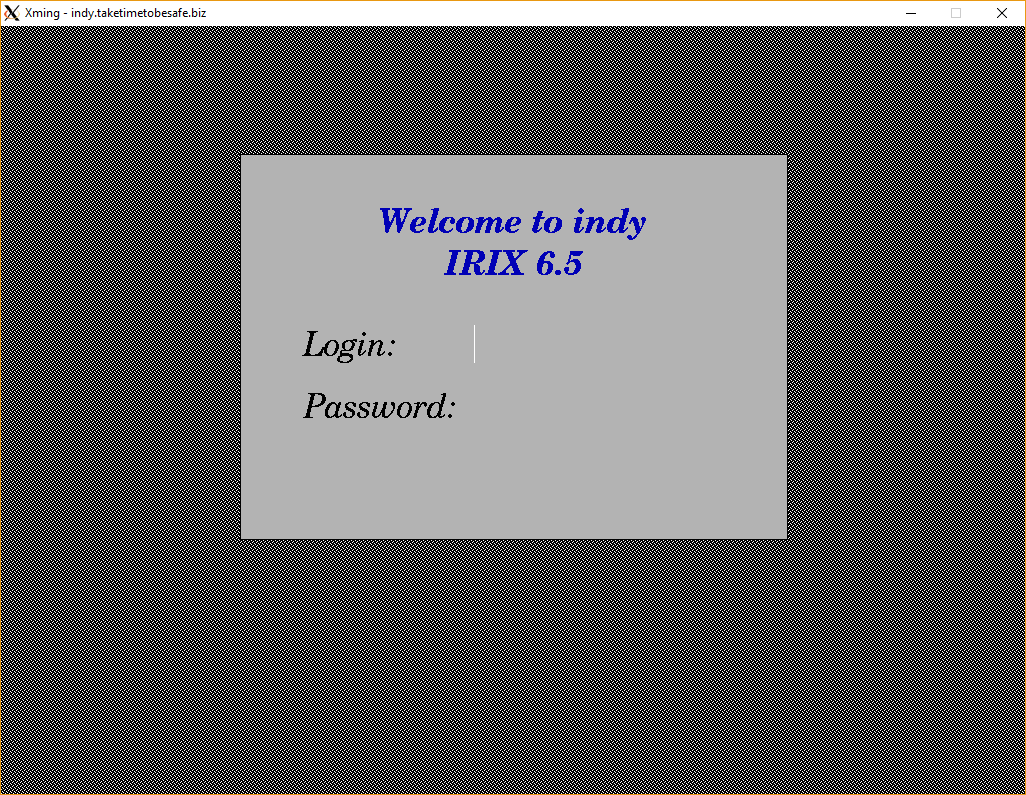
A desktop
My understanding is that on a new IRIX box, you’re expected to log in as the EZsetup user, which launches a configuration wizard. For whatever reason, this doesn’t seem to work at all over a remote session (it logs in, and just goes to a totally empty 4dwm session). No matter, though - I can log in as root:
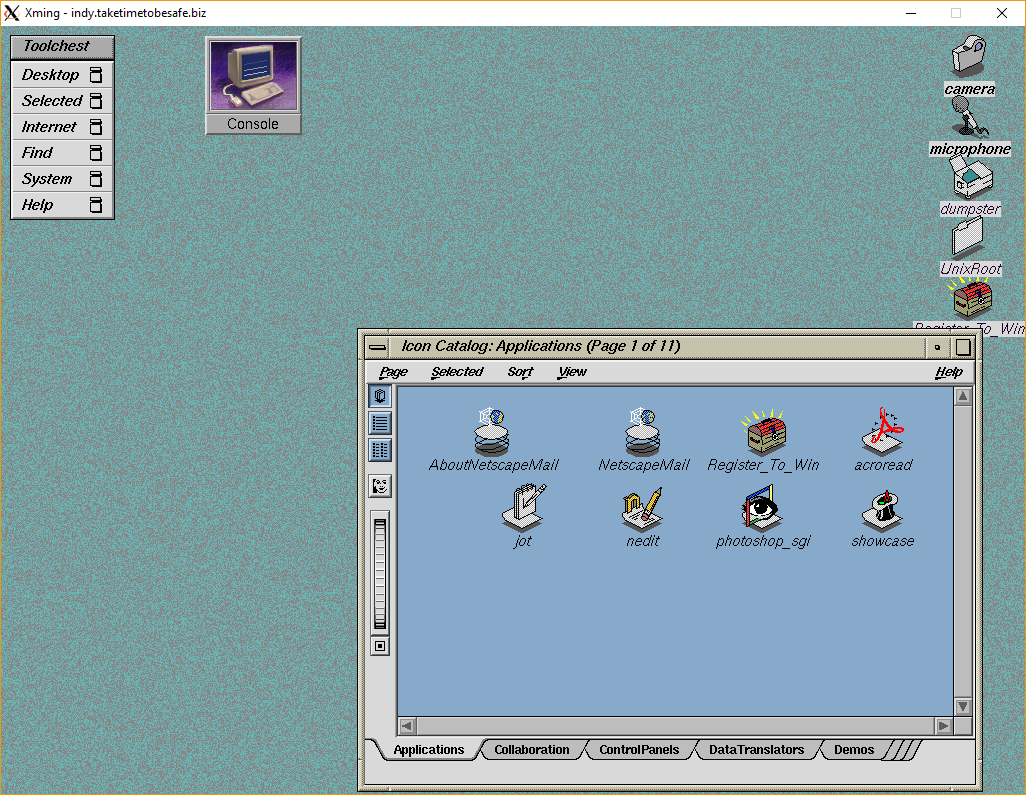
There you have it! I’m rather pleased to get the first GUI desktop from one of my pizzaboxes. Though I haven’t yet made input adapters to use it directly, a remote X session is still a heck of a lot of fun.